Let's See Some Contact Sheets!
Contact Sheets #1
With this post I am starting a new sub-series of newsletters, in which I want to delve more into the process side of things and hopefully provide some insight that may be of use to you, my fellow photography enthusiasts! This is serious nerd-speak territory, so I appologise in advance, haha. Also, please don’t take these too seriously.
Magnum Contact Sheets
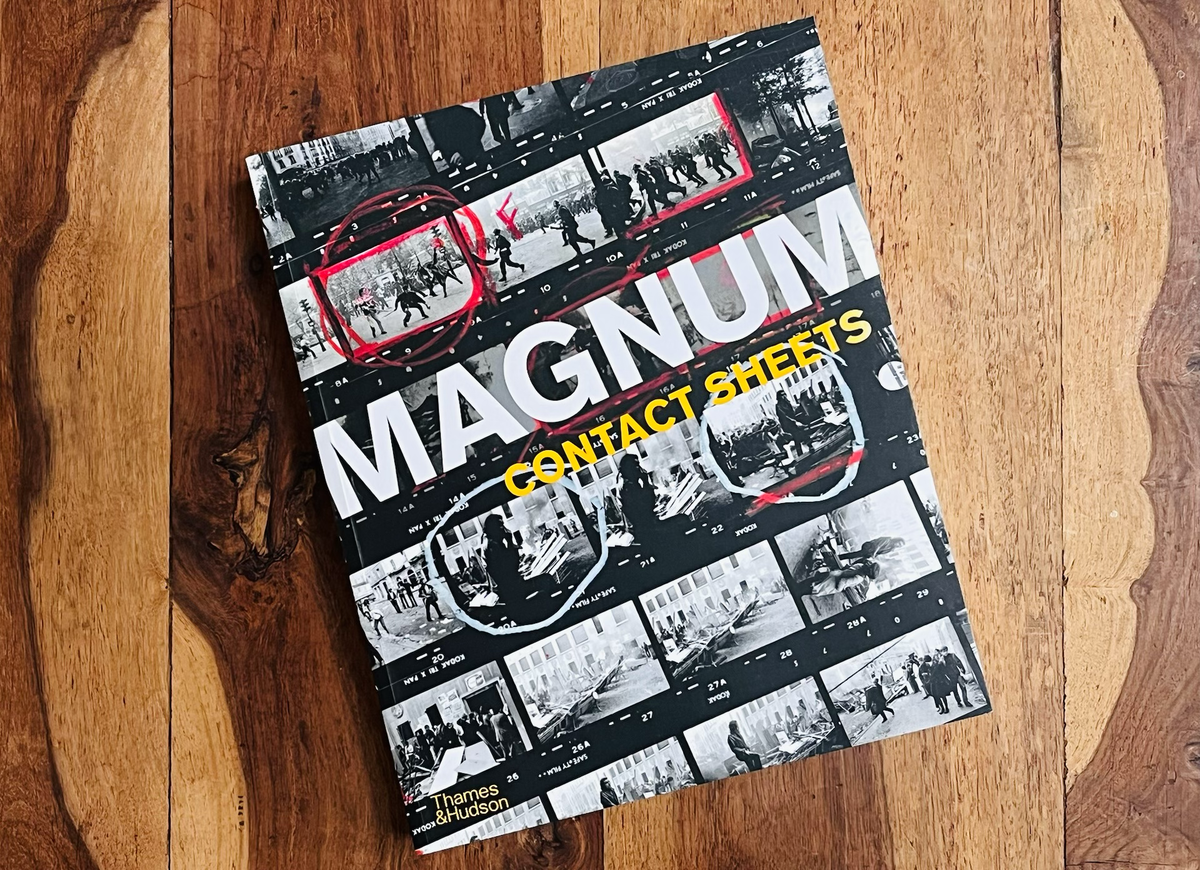
One of my favourite books about the innards of photography is Magnum’s “Contact Sheets” album that is full of, well, contact sheets. I remember purchasing it with curiosity, as it is not every day that the greatest and most established photo journalists and documentarians give us a glimpse into their hidden secrets, their shitty photos, the photos that never made the cut, the photos nobody was supposed to know ever existed.
This book was a revelation to me on many levels. The first being that it is in fact true that Magnum photographers don’t shit with flowers only. There were rumours of course, but this book gave us evidence!
The book is massive, and I return to it quite often, always discovering something new. Of the many many takeways, I would list the following:
Many a Dud Leads to a Banger
The great images we remember from history are often preceeded anf followed by simply average photographs. This is the part of the process we rarely see, so we assume that all those great photographers shot only brilliant pictures. This book proves that it is indeed not true.
Analog Photography Does Not “Slow You Down”
The analog “slowing you down” concept is in my opinion one of the main offenders that skews our perception of film photography today. In film’s heyday, photojournalists on assignment had huge budgets and loads of film. They shot as much as we do today using digital. The only difference was that amateurs did not have these same budgets, so skimping on film and “thinking of every frame carefully” were a byproduct of financial limitations and not of artistic choice or inherent qualities of film photography. In essence, there is nothing wrong with working the scene and shooting multiple repeats. Seeing those contact sheets from HCB, who spent several rolls of film to get a single shot of kids playing in the ruins, made me feel better about my shooting practice.
When I started taking photos myself there was no digital, and film wasn’t exactly cheap. After years of skimping on frames, I got so used to not taking pictures that I continued to not take pictures even after I switched to digital. I finally managed to let go of that in recent years, and my photography improved manyfold. Of course, I am not sparaying and praying, and I am still trying to get something out of every frame, but I am no longer afraid of taking multiple photos of the same scene.
Bangers Happen
Going through the contact sheets in the book one can not notice that some of the most brilliant frames came just out of the blue. There is nothing before or after them to explain where they came from. To me this is proof that being ready and vigilant are the crucial qualities for being successful in photography. You can work the scene as much as you want, but sometimes you take a single frame and it is the one.
Your Archive Shows Your Growth
With the exception of maybe the aforementioned HCB (who cut out all the duds from his rolls and left only “the good ones”), Magnum kept the archives of photographers’ work for future reference, and this is exactly what I do as well. I never delete photos. I keep everything to be able to track my progress (if any), and I study my past work every now and then to find out things I did not notice in my initial edits.
Let’s Get Behind the Scenes
If you haven’t seen my previous post about picking broccoli, now is the time, as I’ll be discussing the entire photo shoot from that day, and you can see the selects in that post.
As part of this Contact Sheets sub-series, I want to share some behind the scenes of my workflow, and show you my virtual “contact sheets”. Not for bragging rights, but to show you my own struggles and little victories, and to encourage you to look at your own archives with kind curiosity and better understanding of what is going on there.
The proof is in the pudding as the Brits say, so here we go.
How I Work
First, some general information about my workflow.
- I try to be as objective and unintrusive as I can. I love the fly-on-the wall concept, and this is my main principle when doing documentary work. Of course, when taking portraits, there is some direction on my side, but otherwise, all my photos are candid. There are many missed opportunities in my photos, and I am okay with that.
- I never shoot in series, always single exposures. So what you see are separate photos, and not a result of a 5 fps burst.
- I only use prime lenses, 28mm, 35mm, and 50mm on full frame. Changing lenses takes time and I try to do that deliberately.
- When importing images to my computer, I batch apply my favourite preset and the same basic adjustments to all my photos. Usually this is enough processing for my needs. Sometimes I will mask the sky and adjust exposure. But I never spend more than half a minute processing a photograph.
- I usually don’t crop, but I don’t consider it a crime either.
The Meat
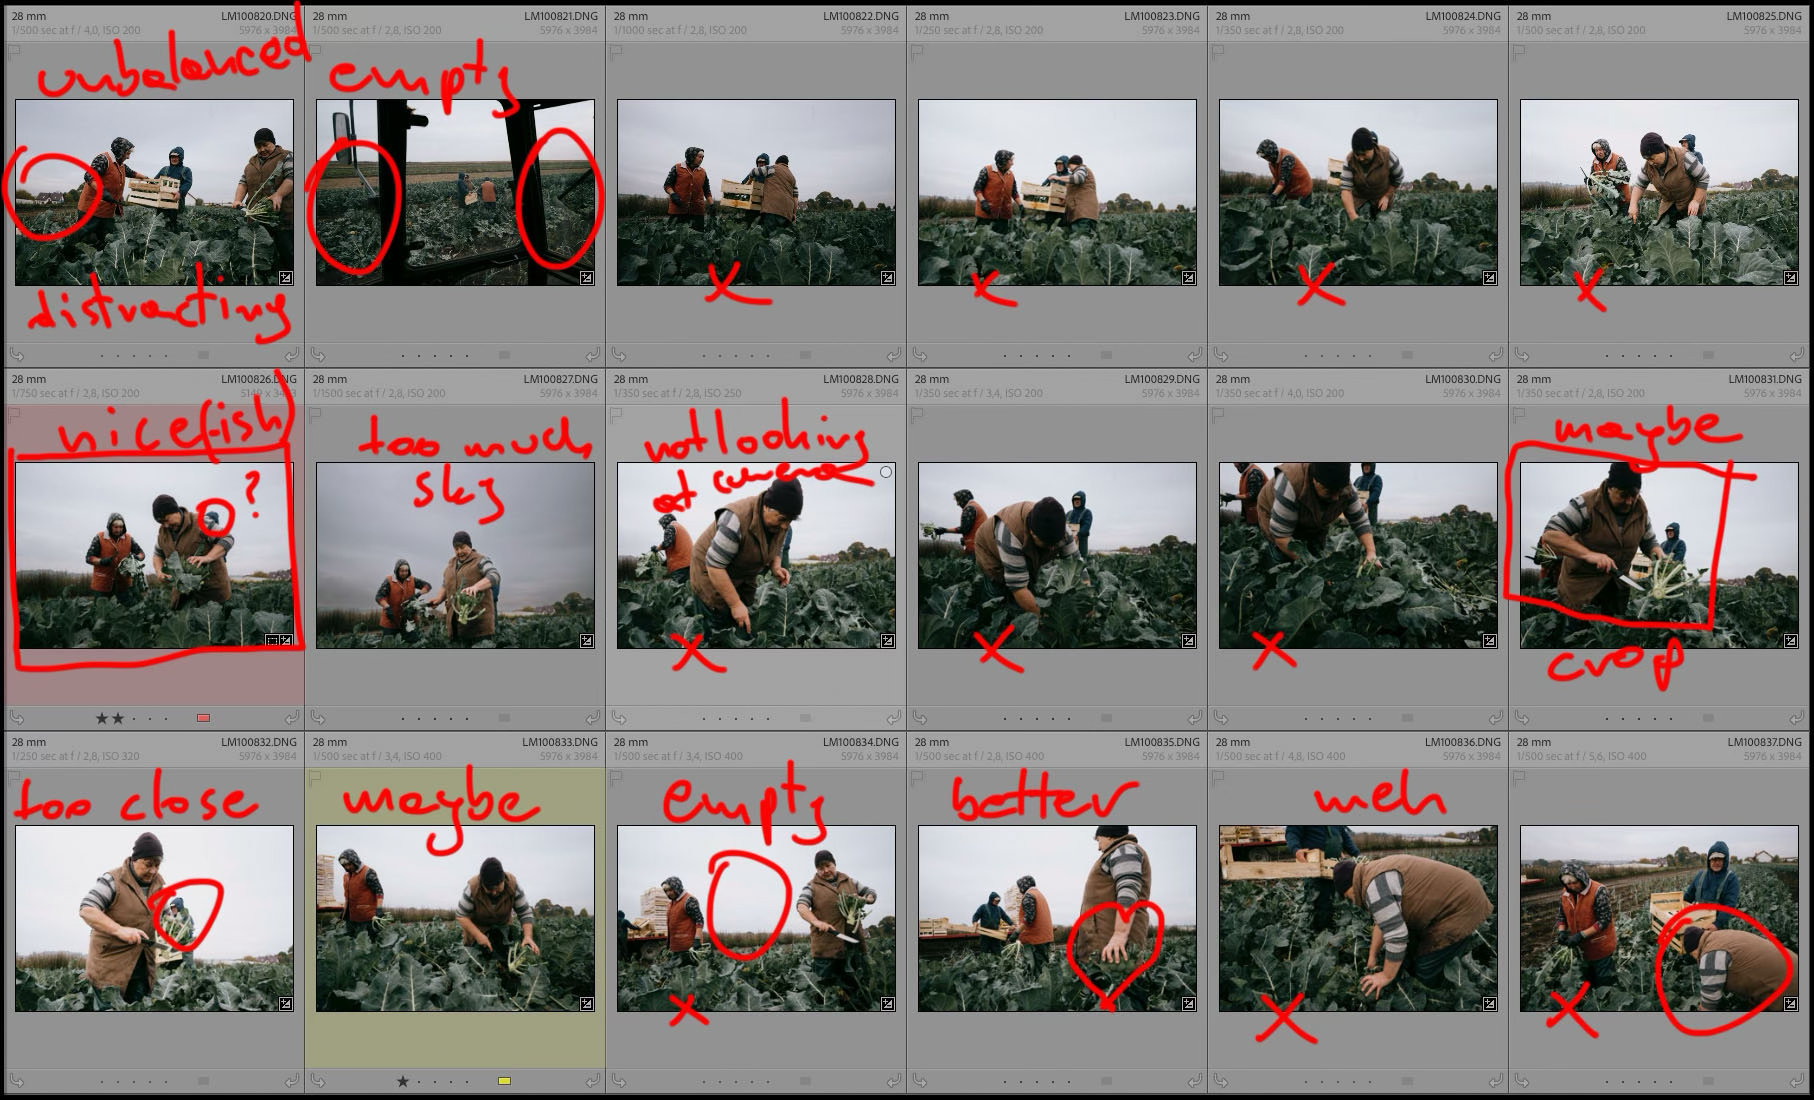
Here’s some “contact sheets” of consecutive images from my last shoot. When working in lightroom I use stars and color labels to mark my candidates and picks. I start with adding stars to mark the photos I like, and then proceed with color labels; yellow for candidates (that is all photos with any stars assigned), and red for my final picks. I usually print out all the candidates when working on a sequence, and my final selection is then marked as the picks. I use a Canon Selphy printer for this purpose.
The red markings on the screenshots are here to illustrate my thought process and image analysis. I am not going into great detail as does, and my choices are mostly off the gut.
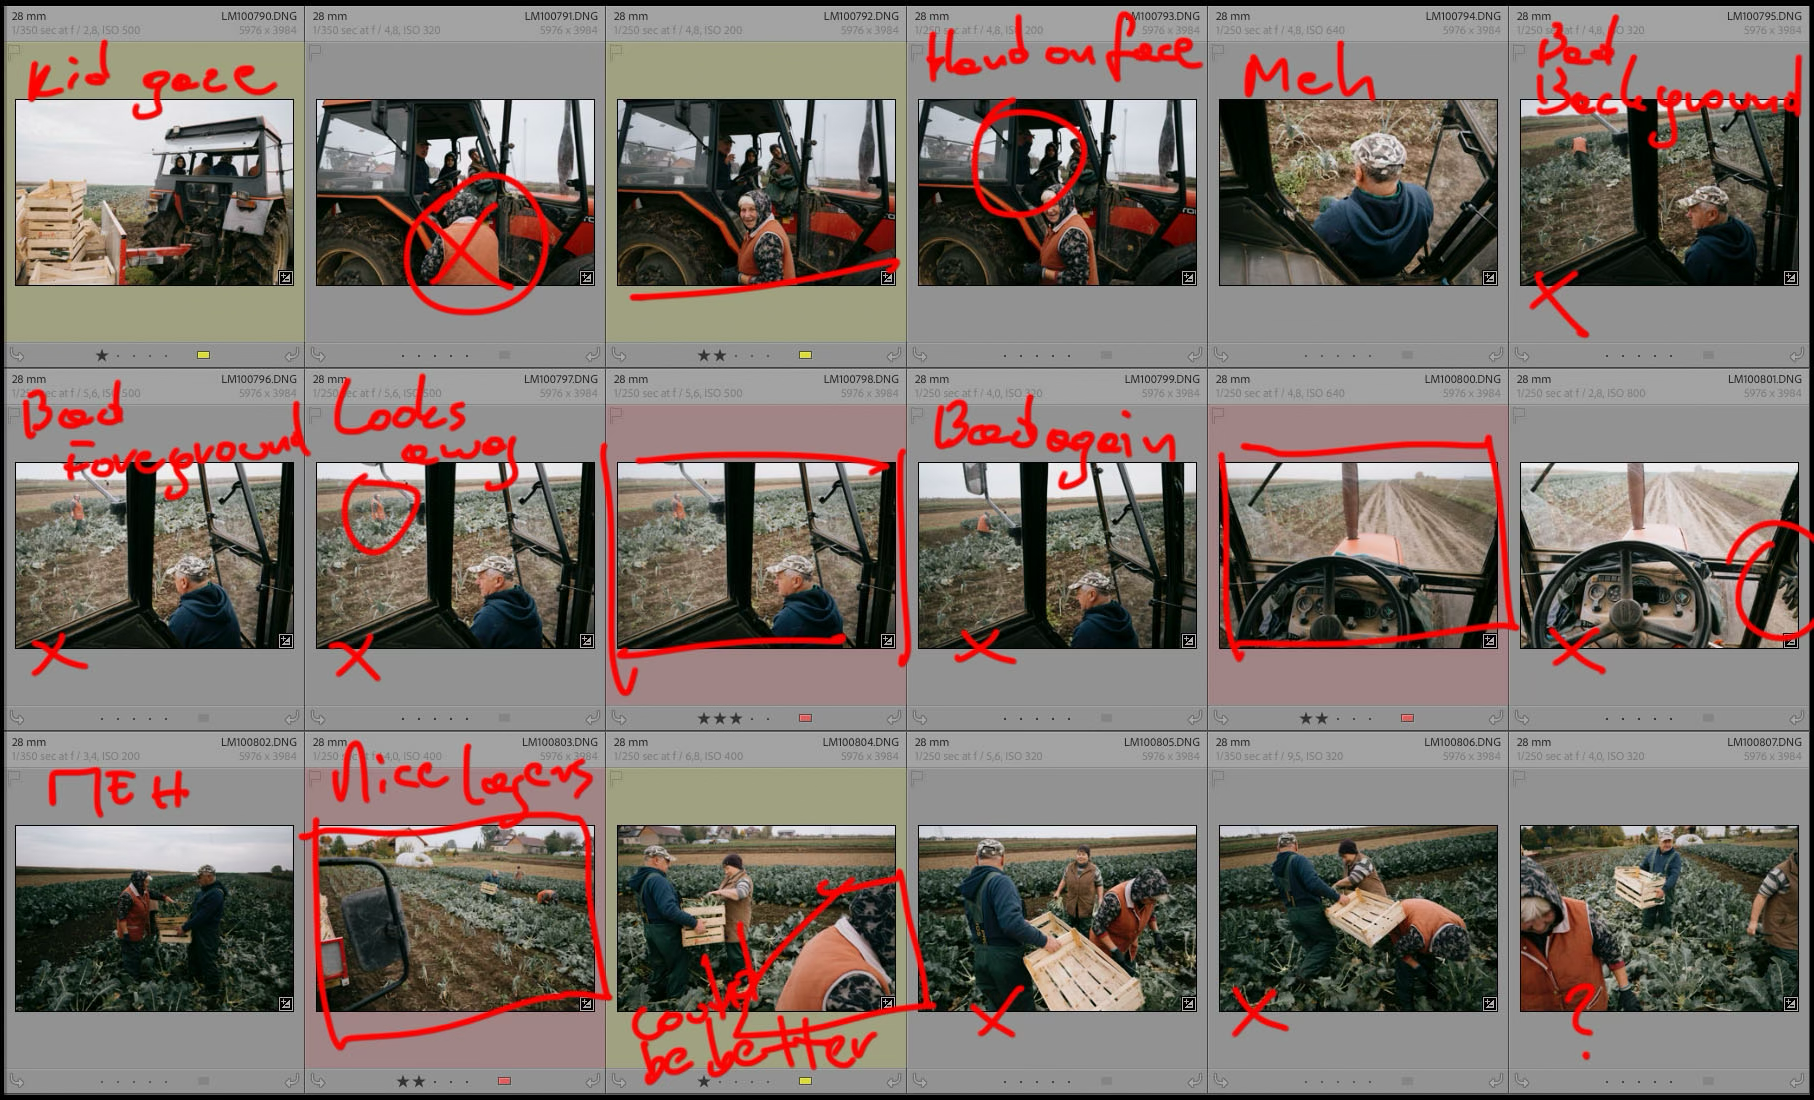
In the first sequence, I am surprised to have three picks already. This is the very beginning of the shoot. I tried to get something interesting with all the people in the tractor, but that didn’t pan out. Once everyone got out, I had to sit behind the wheel and drive the thing along the field, hence the perspective. I like the image from inside the tractor, with the man in foreground and the woman in the field. It took me several frames to get the image I wanted, where they both look interesting, and the image is most engaging. I followed that with an image from behind the wheel. It may not be the most interesting, but I wanted to have some images that would break the monotonny of images with people and broccoli. I am quite fond of the image from the door of the tractor, as it has some layering, and shows a wider view.
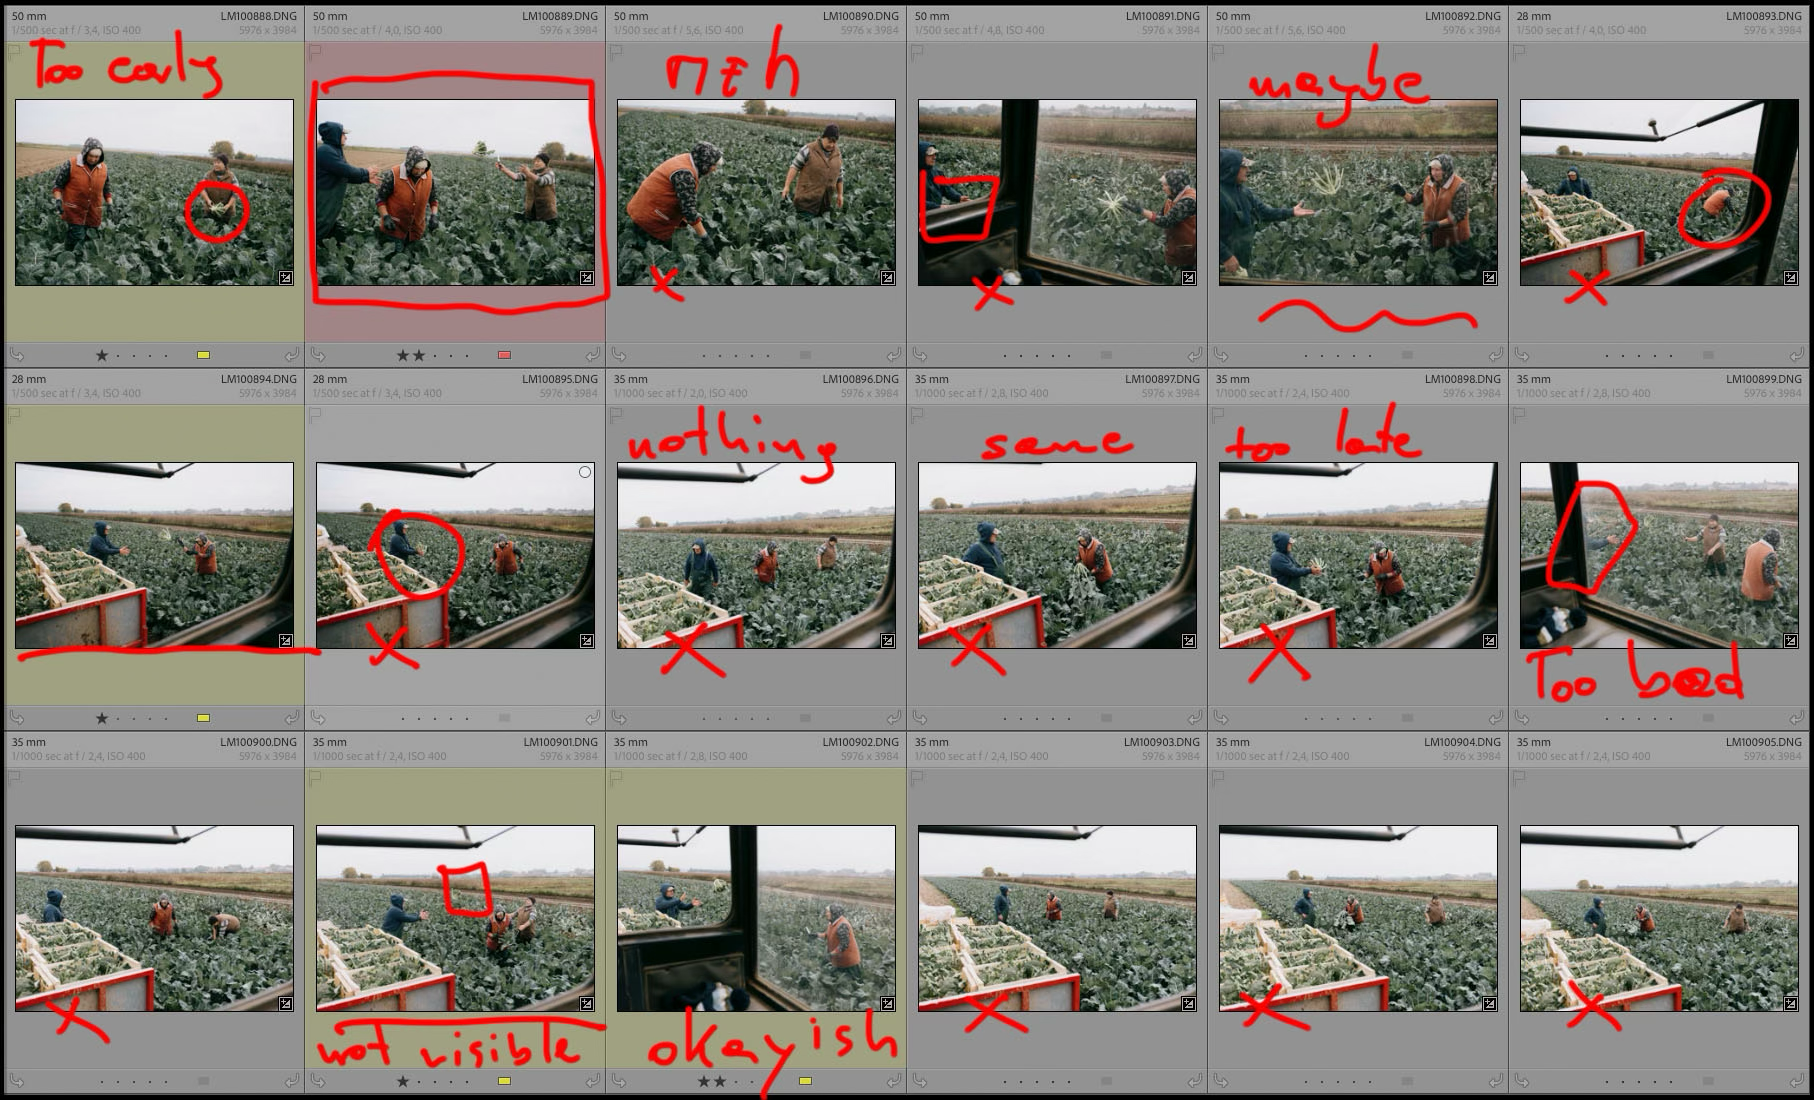
After dismounting the tractor for a moment, I went into the field, trying to get a photo with brocolli being thrown across the field. My pick came about quite early in the sequence, and I also tried to incorporate the tractor cabin as a framing device, after I had to get back in to drive. This sequence was really a hit and miss, and I gave up quickly.
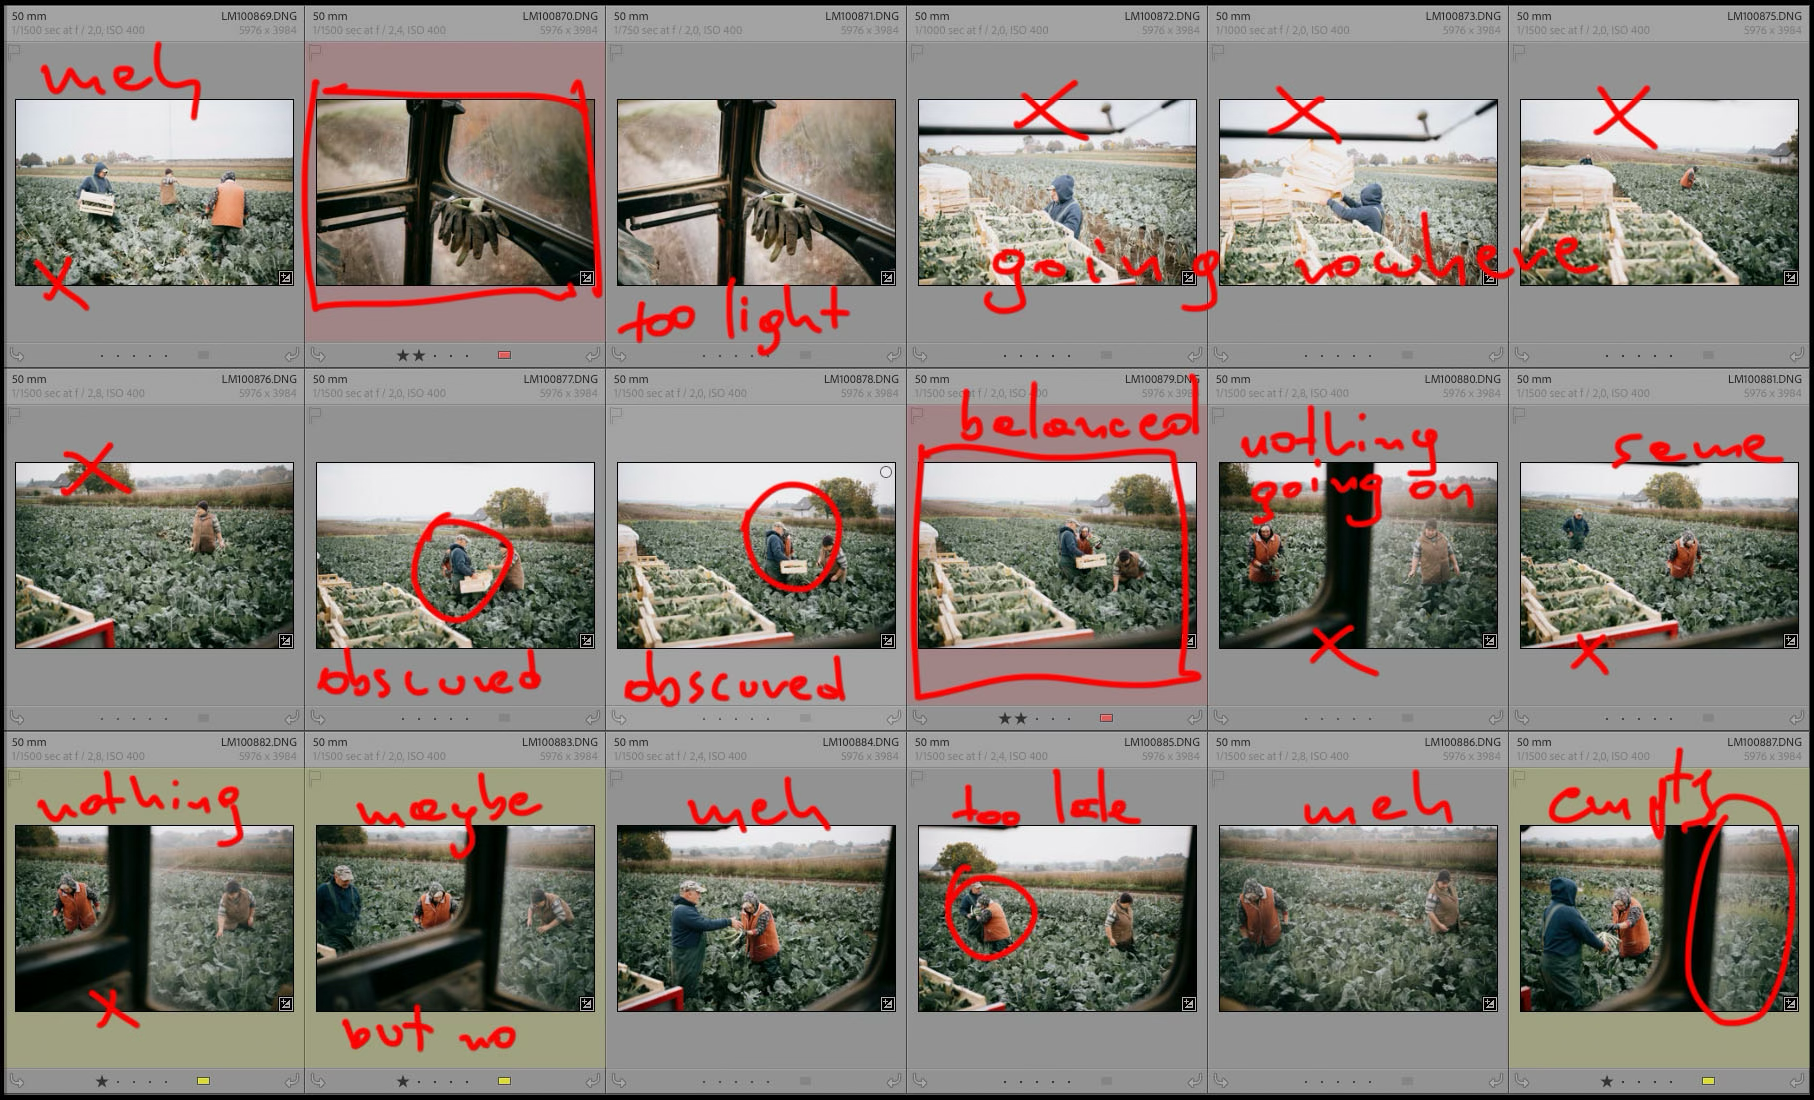
Back in the tractor, I took the photo of the gloves, which I liked, and continued trying to find an interesting frame. I switched to w 50mm because my subjects were a couple of meters away, and I wanted to have a shallower DoF. My pick is in a way a rehash of the general view from the first sequence, but it was shot in the opposite direction, so it adds some visual interest to the final sequence.
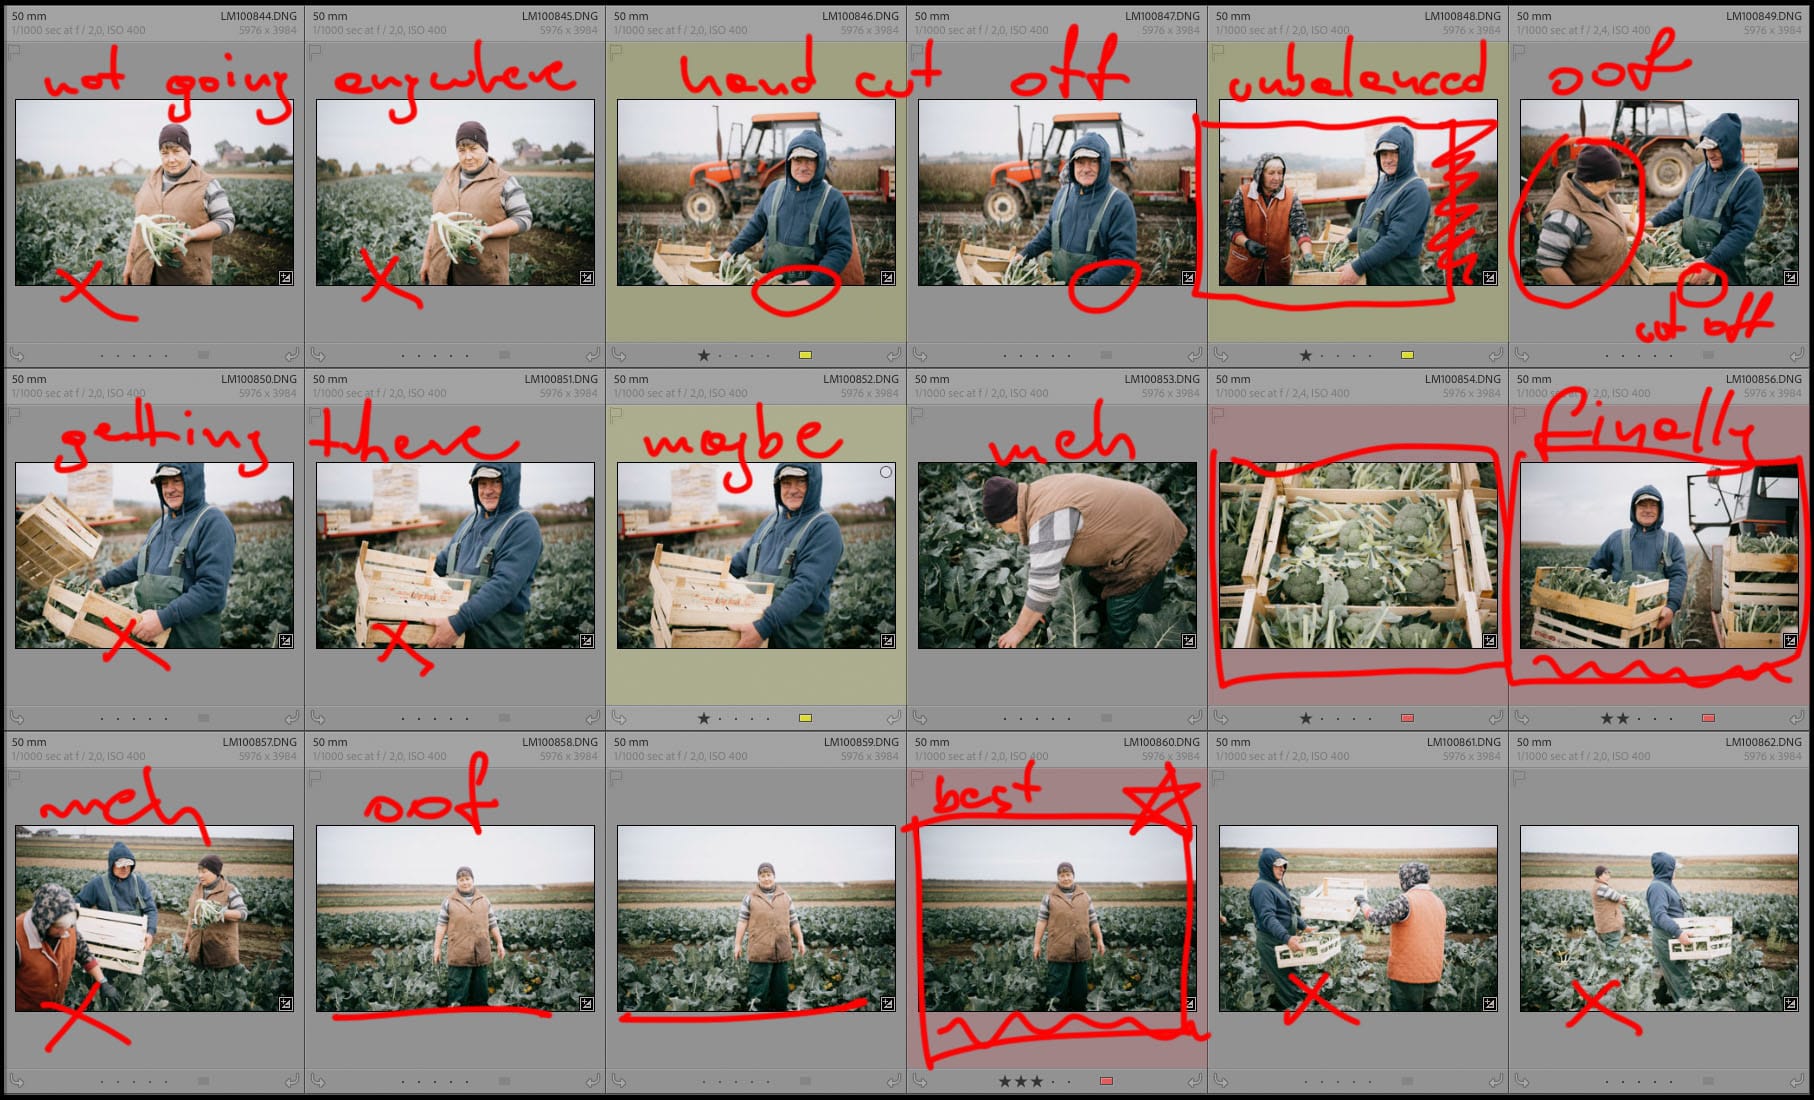
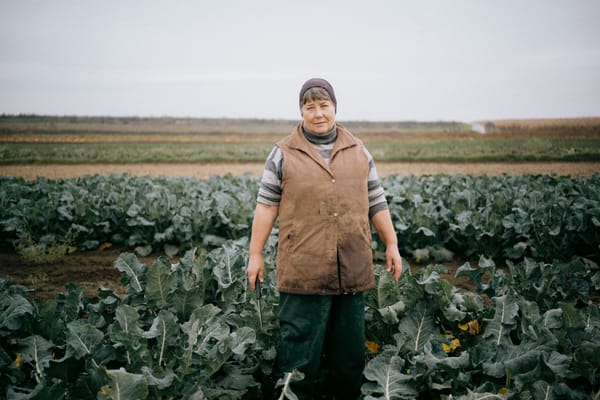
After dismounting again, I figured this was the best time to try and get some portraits. I started without directing my subjects, but ultimately, the best photos came out after I asked them to stop working and give me that half a minute for a photo. I am particularly happy with the photo of the lady with the knife. I shot three frames just to make sure that I got correct focus using the rangefinder and a fully opened aperture.
I then switched back to 28mm to get some more “action photos” from close up. These may look static, but in fact everyone was moving quite quickly, which is the reason for so many missed frames. I am not particularly fond of any of those, but the one I picked is okay-ish. It was quite challenging to get all three subjects inside the frame in a meaningful way.
After that I tried shooting some more broccoli throwing again, but didn’t get anything interesting, and the shoot was over. All in all it lasted about two hours, and I shot exactly 125 photos. My final selection was 12 photos, with a couple more candidates left. Usually I don’t take this many photos, but I am quite happy with the results.
I hope you’ve found this post interesting, as it is usually not the case that you can see the process behind the photos selected for presentation. Let me know what you think of this format. I don’t plan to make these contact sheet posts too often, but I write them when there is something interesting to show.
Till the next one!
Jakub